
From blank screen to fully functional Ghz scope
I acquired a Tektronix TDS7104 oscilloscope that was non-functional. When powered on, the built-in touchscreen was totally blank, but the fans spun up and the lights behind the buttons came on, so it seemed like there was hope of restoring it. This build log details my attempts (successful and otherwise) to repair the system.
Primary Investigations
The first step was to assess the damage. A quick google search revealed a few interesting facts about this line of scopes: they are not merely oscilloscopes, but in fact fully-fledged windows PCs, running Windows 98, 2000, or XP depending on the specific year of production. Further digging revealed that the blank screen issue was often associated with a failure of the motherboard CMOS battery, causing the system to default to the VGA monitor output on the back of the instrument. This gave me hope that the issues might be OS-related, and the valuable scope hardware was still recoverable.


After finding a monitor with VGA input, I plugged it in, et viola! Text on the screen! My victory was short-lived, however, as the text on the screen was of the unfortunately dissapointing variety. It seemed that the computer was unable to read from the main hard drive. More investigation was warranted.
Some time exploring the back panel revealed a removable hard drive enclosure containing a 2.5″ 16 GB parallel-interface spinning hard disk that made a telltale rattling sound when moved; it seemed I had a bad drive after all. No better opportunity for an upgrade! I ordered a brand-new 64 GB SSD replacement drive, and got to work chasing down the scope firmware.
At this point, I had learned that the system would never work properly without the CMOS RAM (actually called “Nonvolitile BIOS Memory”, but frequently referred to by the gate tecchnology used to create them), which held important settings for the BIOS that allowed the front screen and buttons to be used. The CMOS battery is a small coin cell on the motherboard that provides just enough voltage to keep the volitile memory alive, but when the battery runs out, those settings are lost. This is a known issue though, so the good folks at Tek thought to include a BIOS memory flashing tool in with their distribution of windows. If my hard drive was still working, the solution would be to boot up through the VGA port and run the tool. The failure of the hard drive meant I was stuck until I could find a copy of the custom Windows 95 image that Tektronix used on these machines.
I spent the next several weeks combing through blog posts, forums, and ancient websites on the Internet Archive searching for anyone who had made a copy of their scope’s hard drive. After weeks of fruitless searching, I was ready to give up, so I shelved the project while I moved across the country to begin grad school.
Further Diagnosis
As luck would have it, nearly a year later, I met a professor at Boston University who had an interest in the project and had also acquired a broken scope of the same model with a differrent issue, one which left the hard drive fully intact. Together, we cloned the donor drive onto my new SSD and attempted a boot. No luck. Just the same cryptic errors about failed drives.
Not be deterred, it was at this point that I (finally) thought to hunt for a service manual, which was surprisingly available and easy to find. It was here that I learned that, in the event the system cannot boot, I should chack the CMOS battery. I knew this, of course, every computer repairman knows this. That’s how I got here. I needed to reflash the BIOS settings because the CMOS battery was bad. I read the manual again, searching for any possible hint as to how to flash the BIOS settings after the CMOS battery failed –
And then I realized that, despite knowing all of this, I had never bothered to put the new battery in.
Fresh CMOS battery installed, I was treated to a fully-functional BIOS setings menu! From here, I could set the boot drive, clear the old passwords, and start a boot. Finally, some progress!
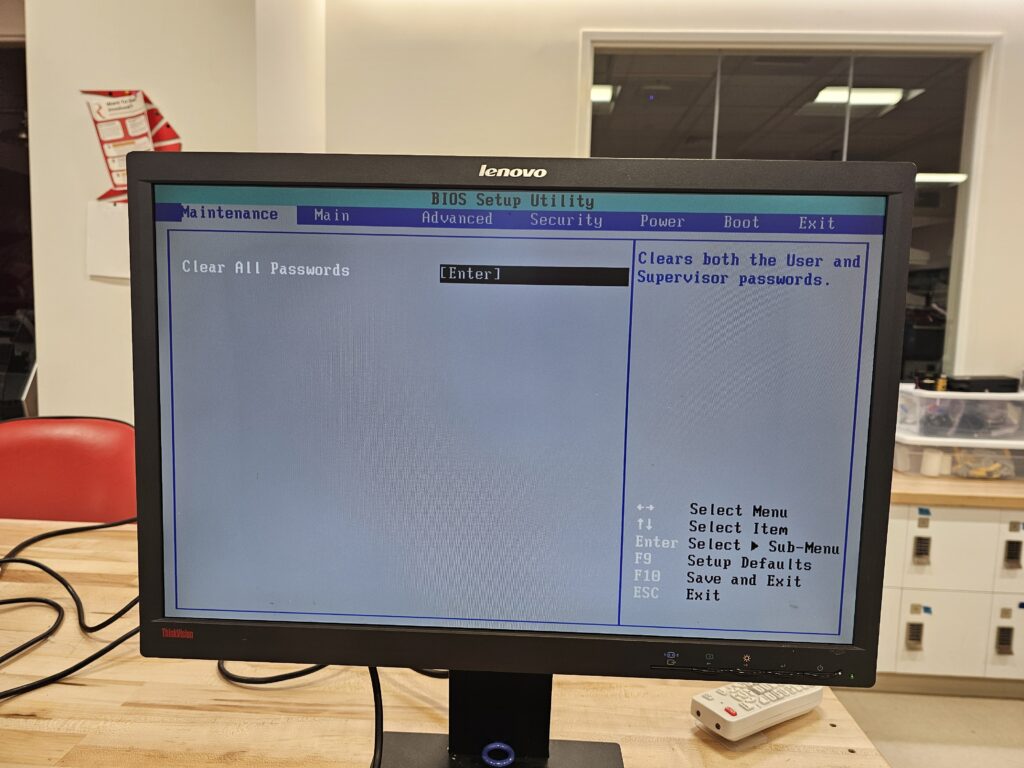
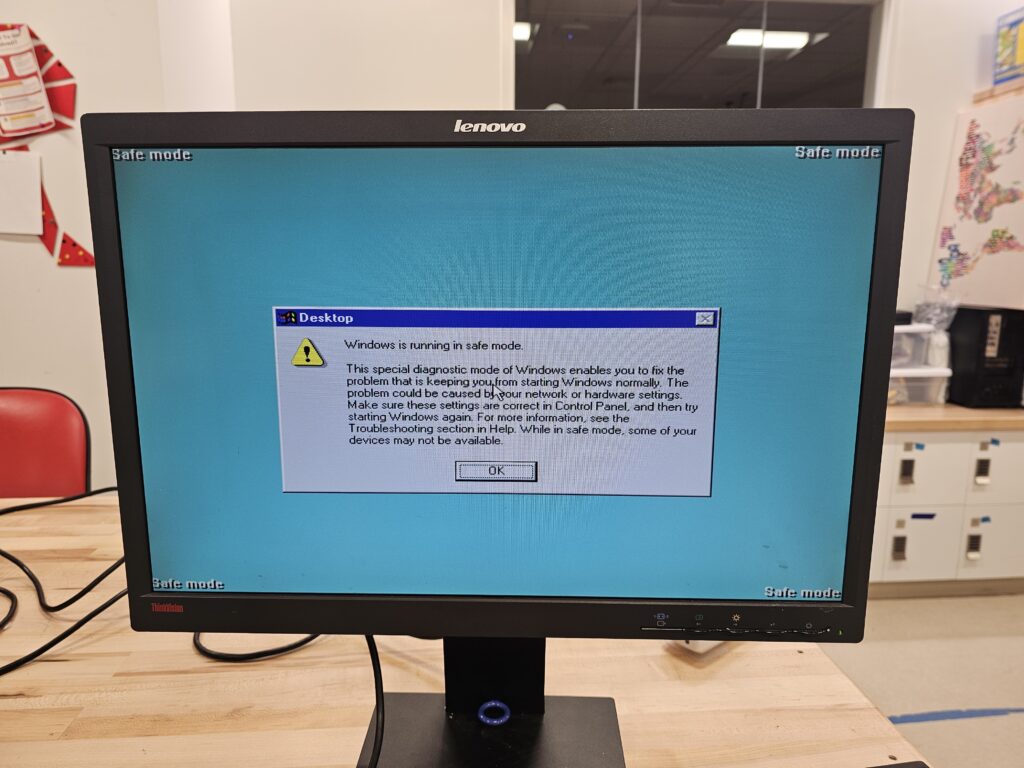
Once again, though, my victory was tainted by the spectre of another issue on the horizon. When booting normally, an ominous message appeared, stating “This is not a radisys sytem! The system will now restart” (like a fool, I forgot to take a picture of it). However, the system did boot just fine in safe mode, so I was at least able to run the CMOS flash script and restore the screen.
Bali vs Radisys
More research, more learning. It turns out that these scopes are quite complex under the hood. The oscilliscope has three main boards: an analog-to-digital acquisition board to do basic signal conditioning and sampling, a PowerPC (an older, but highly reliable, computer archetecture) mainboard to run the oscilliscope firmware, and an Intel x86 motherboard to run the Windows OS for the user interface. Over the many years that Tek build 7000-series scopes, they had two different manufacturers for the Intel boards, Bali and Radisys. Fate, being a fickle master, had blessed me with a donor scope that was just different enough to be incompatible; my scope was an early Bali while the donor was a later Radisys machine.
It was at this point that we turned our attention to the donor scope, which had its own issues to solve. The Radisys scope booted just fine, but the actual Tektronix software package would always hang on launch. This issue was associated with the failure of yet another battery-supported memory chip, the PowerPC NVRAM (Non-volitile memory), which contained configuration settings for the oscilliscope firmware.
We removed the outer panels to gain access to the serial debug port on the side of the instrument, which confirmed our fears. On boot, the serial port would report an empty configuration. We could manually set the correct configuration values (sourced from an extremely helpful Github repo1), but they would not persist after reboot – no NVRAM storage. But if we set the values correctly and then restarted the scope software, it worked! With the taste of victory finally on our tongues, we found a source2 for replacement memory chips that use flash rather than battery-based NVRAM, to prevent this happening again in the future.
After installing the chip and setting the values one last time, the scope was good as new. One down, one to go!
Home stretch
It was not long after this that we were also able to identify a forum user who had decided to dump the entire OS from his Bali scope to a private FTP server, and offerred to share with anyone who needed it. Ihave chosen not to share the identity of this angelic man, but to instead pay his kindness forward. If anyone finds this article and is in need of an OS restore image for either the Bali or Radisys versions of the TDS7104, find my contact information at the bottom of this page and I will be happy to help you get your scope working again!
Here she is, in all her glory, measuring nothing but thermal noise on the probe.

Bibliography
This entire project would have been entirely impossible without the brave and generous people who came before me. In an effort to leave the state of these projects better than I found it, I have collected the various resources that I found most useful into one single place here for posterity.
- Very helpful Repo about repairing all sorts of issues with these scopes: https://github.com/exit-failure/tds7000
- EEVblog thread about repairing this scope: https://www.eevblog.com/forum/testgear/tek-csa7404-repair-project/550/
- TDS7401 Manual:
https://www.tek.com/en/oscilloscope/tds7054-manual/tds7104-and-tds7054-instructions - And Service Manual:
https://www.tek.com/oscilloscope/tds7054-manual/tds7000-series-service-manual
- Github Repo with advice on NVRAM flashing: https://github.com/exit-failure/tds7000/tree/main/NVRAM ↩︎
- Ebay listing for batteryless NVRAM replacement:
https://www.ebay.com/itm/316045958143 ↩︎